How to Root & install CWM recovery on Galaxy Core 2 SM-G355H


Download Files:

Rooting Package for Samsung Galaxy Core 2 SM-G355H. 
CWM Recovery for Samsung Galaxy Core 2 SM-G355H. 
Odin3-v1.85 Multi Downloader.

Procedure to Root Samsung Galaxy  Core 2 SM-G355H:

Step 1: Download the Rooting package from the above link and without extracting transfer it on your phones SD card using USB cable. Remember not to place it in deep directories.
Step 2: Now you need to boot your Galaxy Core 2 into stock recovery mode. For that firstly power off your phone completely til it vibrates.
Step 3: For Galaxy Core 2, recovery mode can be entered by pressing and holding Volume up + Home button (Middle button) + Power button simultaneously until the recovery mode appears.
Galaxy Core 2 SM-G355H enter recovery mode
Note: As you enter the recovery mode you’ll notice that touch won’t wok here. So for navigating you need to use Volume Up and Volume Down keys  and Home button (Middle button) for selection.
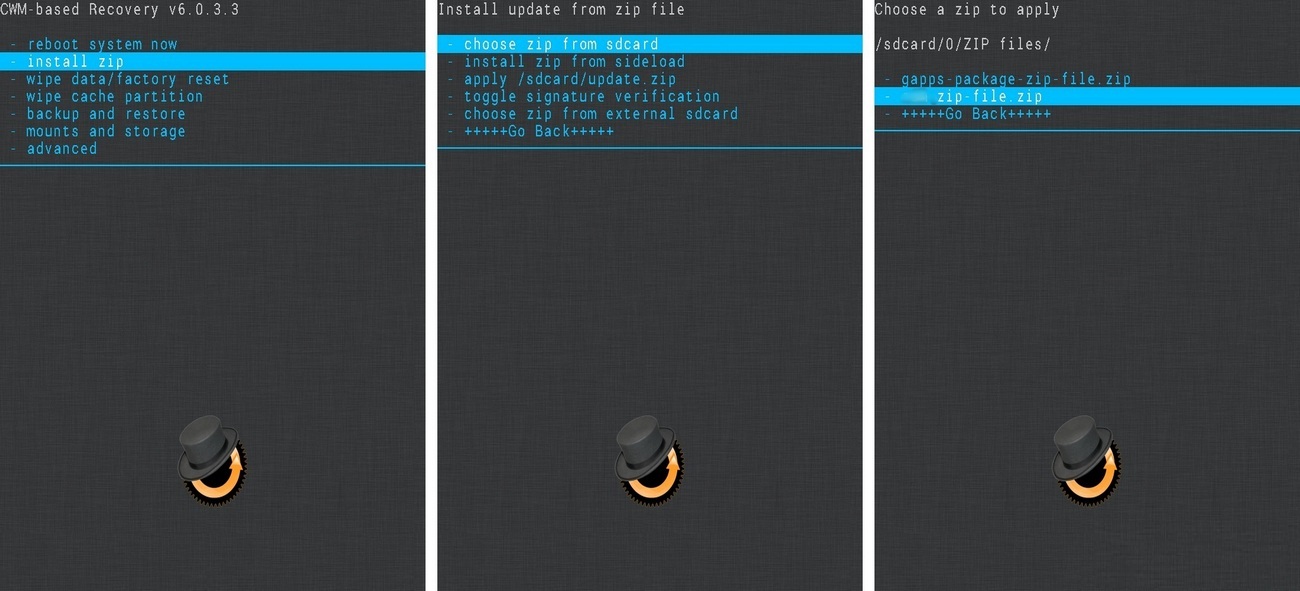
Step 4: Now navigate to the ‘Update from SD card’ option using Volume keys and select it using the Home button (Middle button).
Step 5: As you click on it, you’ll see all the files and folders located on your external SD card including the Rooting Package file which you have copied earlier.
Step 6: Now again using the volume keys, navigate to the Rooting Package (Update.zip) file and select it using Home button. On the next screen select Yes option to start the Rooting process. Be patient until it completes successfully.
Step 7: After successful rooting, you’ll again return to the main menu of Recovery mode. Just restart your Galaxy Core 2 by selecting ‘Reboot system now’ option.
That’s all! You’ve successfully rooted your Samsung Galaxy Core 2 SM-G355H smartphone. An app named Superuser installed on your phone will confirm that your device is properly rooted. This Superuser app supervises each and every app that requires a root access.
You can use this Root Checker app to confirm the same.
Galaxy Core 2 SM-G355H root checkLets flash the CWM recovery now.

Procedure to Install CWM recovery on Galaxy Core 2:

Step 1: Download the CWM recovery package file on a specific folder on your computer. Extract it and you’ll see a recovery.tar.md5 file.
Step 2: Also download and extract the Odin3-v1.85 on your computer.
Step 3: You need to boot your Galaxy Core 2 into downloading mode. For that firstly switch off your phone completely till it vibrates. Then press and hold Volume down key + Home button (middle button) + Power button simultaneously till you see a warning message. You may leave all the three keys now. Just press Volume up button to enter downloading mode.
Download mode
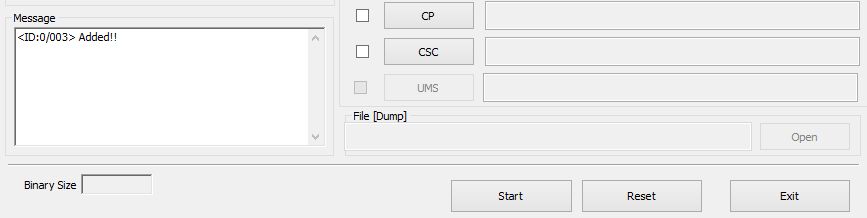
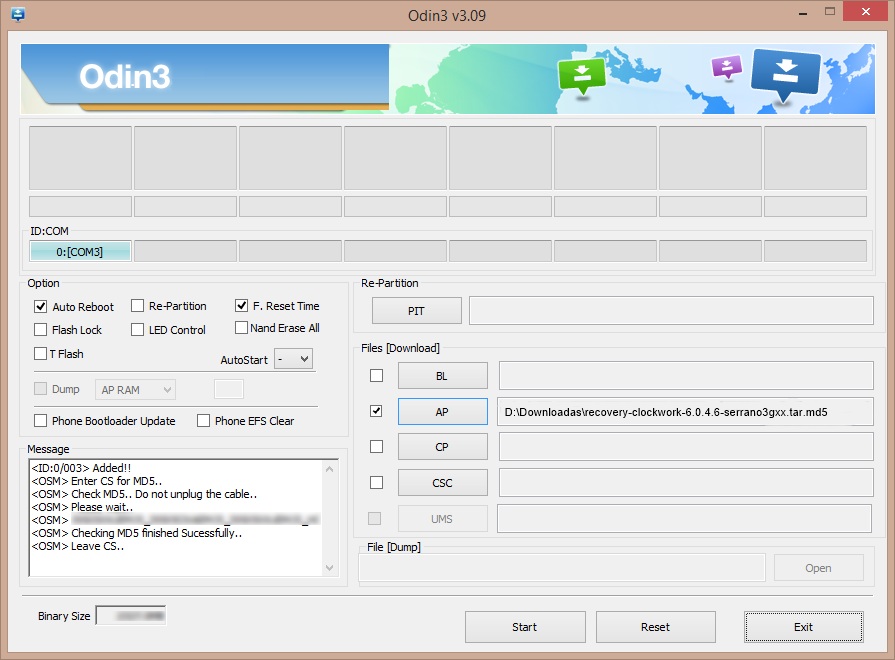
Step 4: Using USB cable connect your phone to PC. Now launch Odin3-v1.85 software on your PC. As you open it, the ID:COM section in it will turn yellow. Also an ‘Added‘ message will appear in the message box window. This will confirm that your Galaxy Core 2 has been successfully connected to your PC. If such thing doesn’t happen then try using different USB ports or different USB cable or just re-install the device specific drivers from the links given in Prerequisite section.
Galaxy S3 Neo cwm recovery odin screenshot1
Step 5: Now tick the Auto-Reboot and F.Resest Time options present on the Odin window. Do not tick or un-tick anything else.
cwm recovery odin screenshot 2
Step 6: On the Odin window, to the right hand side you’ll see a tab named PDA tab. Select that and locate the ‘recovery.tar.md5‘ file which you have downloaded before & select it.
cwm recovery odin screenshot 3
Step 7: After completing everything as mentioned above, simply press the Start button located on the Odin window to initiate the CWM recovery flashing process. Your phone will automatically reboot itself while going through the process. It is recommended not to touch or remove the USB cable until the process completes.
cwm recovery odin screenshot 4
Step 8: Be patient until the installation of CWM recovery completes. It will hardly take a minute. As soon as it completes, you’ll see the Pass message on the Odin window. You can safely remove the phone from PC now.
Note: If due to any reason the process fails or if Odin gets stuck or in case your device gets boot loops, then don’t panic. Just close the Odin window, remove and re-insert the battery from your device. Again go into downloading mode and repeat the whole procedure as given above.
Step 9: For confirming that CWM recovery has successfully installed or not, boot your Galaxy Core 2 into recovery mode. For that, firstly switch off your phone completely.
Step 10: Now press and hold Volume up + Home button + Power button simultaneously til the recovery mode appears. You’ll notice that Clockworkmod recovery is properly installed on your Galaxy Core 2.
Step 11: You can restart your phone by selecting the ‘reboot system now’ option present on the recovery mode itself.
Success

How to root Samsung Galaxy Ace 3 GT-S7270


BEFORE WE BEGIN

Download the following Rooting package, based on your device model number and save it to your desktop

HOW TO FLASH (INSTALL) CWM RECOVERY ON SAMSUNG GALAXY ACE 3

  • First of all, download and install the Samsung USB drivers on your PC
  • Next download the root package for your device from above
  • Connect your phone to PC via USB cable and transfer the Root.zip file to the internal memory of your phone
  • Download the ODIN package and extract it to your desktop too
  • Disconnect the phone and power it off
  • Open the ODIN folder you extracted in Step 4 and run the Odin3 exe file as administrator
  • Now power on your phone while pressing the Volume Down + Home + Power buttons at the same time. This will boot your phone into Download Mode
  • Now plug in your phone to the PC. You should see an Added! message in the Odin window
    image: http://cdn1.dottech.org/wp-content/uploads/2014/02/Device-Added-Odin-620x155.jpg
    Device Added Odin
  • Click the PDA or AP button in ODIN and load the touch.tar OR nontouch.tar file, depending on which one you downloaded
  • Leave everything else in ODIN as it is. Check screenshot below for confirmation
    image: http://cdn1.dottech.org/wp-content/uploads/2014/02/ODIN-flash-CWM-S4-Mini-620x457.jpg
    ODIN flash CWM S4 Mini
  • Double-check everything in ODIN and click the Start button to start flashing the CWM recovery image on to your device
  • Once the flashing is complete, you should see a Green PASS message at the top left in ODIN. It is now safe to disconnect your phone. CWM Recovery has been flashed on your device

HOW TO ROOT SAMSUNG GALAXY ACE 3

  • Power off your phone
  • Reboot to CWM Recovery. To do so press and hold the Volume Up + Home + Powerbuttons together. Release them when you see the CWM screen. In CWM mode, use the Volume Up/Down keys to scroll and the Power or Home key to select an option
  • Select Install zip from SD card, and on the next screen select Choose Zip from SD card
  • You should now see a bunch of folders and files. These are the contents of your internal SD card. Locate the root.zip file you copied over earlier and select it with the Power button
    image: http://cdn1.dottech.org/wp-content/uploads/2014/02/CWM-Recovery-Flashing-Steps-620x281.jpg
    CWM Recovery Flashing Steps
  • On the next screen, select Yes to confirm the flash
  • Wait for CWM to flash the root package
  • Once done, Go Back to the main menu and select Reboot System Now
  • After your phone has booted up fully, open the App drawer and look for the SuperSU app.
  • Congratulations!! Your Galaxy Ace 3 now has full root access as well as the custom CWM Recovery installed!
Enjoy your rooted device.

Read more at http://dottech.org/149733/how-to-root-samsung-galaxy-ace-3-gt-s7270-gt-s7272-and-flash-cwm-guide/#wWyBSvOZvXhGH8yP.99

How to root your Samsung Galaxy ACE Duos GT-S6802


Below is the step by step Tutorial:
STEP-1 : Download the file update.zip from here

STEP-2 : Connect your Samsung Galaxy ACE Duos GT-S6802 to your computer

STEP-3 : Copy the downloaded file (update.zip) to the root of your SD card

Note: If you are accessing this page and downloading the file through your Android phone, then skip step number 2.

STEP-4 : After you have copied the file update.zip to the root of your SD card, turn off the Galaxy ACE Duos .

STEP-5 : Then turn it ON again, but this time go to Recovery Mode. Press power, volume up and home button together.

STEP-6 : Your Galaxy ACE Duos GT-S6802 will boot into a BIOS like display, choose apply update from sdcard. Use volume up and down to scroll, and home screen as enter.


STEP-7 : Browse through the files and choose update.zip and hit the home button to begin the rooting.

STEP-8 : Wait until your Samsung Galaxy ACE Duos GT-S6802  finishes updating.

STEP-9 : And your done! Your Samsung Galaxy ACE Duos GT-S6802 is now be rooted !!!

How to know if your Galaxy ACE Duos GT-S6802 is already Rooted?
You should be able to see the Superuser icon in your Galaxy ACE Duos.

*** This tutorial will also work on  Samsung Galaxy Y, Samsung Galaxy Y Duos, Galaxy Ace  and some other Android 2.3 Devices.

How to root and install CWM for Galaxy V SM-G313HZ


tutorial about How to install CWM Recovery and rooting Samsung Galaxy V SM-G313HZ. But you can also use TWRP Recovery if you do not like CWM and then rooting by following this guide.


Requirement :

Installing CWM :
Quote:
  1. Extract odin and CWM_Vivalto_v6.0.3.7_Build#3_(ODIN_VERSION).zip in the same folder
  2. Open Odin v3.09
  3. Reboot phone in Download Mode (press and hold Home + Power + Volume Down buttons)
  4. Connect phone and wait until detected on Odi
  5. Add the recovery.tar.md5 file to AP / PDA
  6. Make sure re-partition is NOT ticked
  7. Click the start button, sit back and wait a few minutes
  8. Wait until the flashing process is complete

Rooting :
Quote:
  1. Copy UPDATE-SuperSU-v1.94.zip to External SD.
  2. Go to CWM.
  3. Install zip -> from sdcard.
  4. Choose UPDATE-SuperSU-v1.94.zip and wait untill finished.
  5. Reboot system now.
  6. If there is notif "fix supersu blablabla" just press "back" button
Changelo CWM build #3
- Change the HOME BUTTON as selector menu

Bug :
  • can not install zip, backup/restore from/to internal sd.

Old version

How to root your Samsung Galaxy ACE GT-S5830


Below is the step by step Tutorial:
STEP-1 : Download the file update.zip from here

STEP-2 : Connect your Samsung Galaxy ACE to your computer

STEP-3 : Copy the downloaded file (update.zip) to the root of your SD card

Note: If you are accessing this page and downloading the file through your Android phone, then skip step number 2.

STEP-4 : After you have copied the file update.zip to the root of your SD card, turn off the Galaxy ACE.

STEP-5 : Then turn it ON again, but this time go to Recovery Mode. Press power, volume up and home button together.

STEP-6 : Your Galaxy ACE will boot into a BIOS like display, choose apply update from sdcard. Use volume up and down to scroll, and home screen as enter.


STEP-7 : Browse through the files and choose update.zip and hit the home button to begin the rooting.

STEP-8 : Wait until your Samsung Galaxy ACE GT-S5830  finishes updating.

STEP-9 : And your done! Your Samsung Galaxy ACE GT-S5830is now be rooted !!!

How to know if your Galaxy ACE GT-S5830 is already Rooted?
You should be able to see the Superuser icon in your Galaxy ACE.

*** This tutorial will also work on  Samsung Galaxy Y, Samsung Galaxy Y Duos, Galaxy Ace Duos and some other Android 2.3 Devices.

How to root the Samsung Galaxy Ace Plus S7500

How to root the Samsung Galaxy Ace Plus S7500

Download Files:

Download Odin3-v1.85 + CWM recovery for Samsung Galaxy Ace Plus S7500. 
Download Rooting Package for Samsung Galaxy Ace Plus S7500.

Pre-Requisites:

  • Rooting will void your device warranty. But don’t worry it can be easily regained back by un-rooting the device.
  • Backup is the most essential & important step before flashing anything on your device. As disaster can knock your door without knowing you, its better to take this major steps right now. So backup all your data including Contacts, SMS/MMS, call logs, notes, APN settings and copy it somewhere for safety. Also in the last step of this procedure we need to wipe all the data present onto your phones memory.
  • Make sure that the battery of your device is charged at least upto 70% so as to minimize the risk of switching off during the installation process.
  • Make sure that the Mobile specific drivers are installed on your Computer. You can install them by installing Samsung Kies or manually install them from the link given below:
  1. Windows 32 bit x86 drivers
  2. Windows 64 bit x64 drivers
  • Enable the USB Debugging mode on your device by following the path Menu->Settings->Applications->Development->USB Debugging.

Procedure to install Clockworkmod recovery on Galaxy Ace Plus S7500:

Step 1: After downloading the Odin3-v1.85 + Clockworkmod recovery file, extract it on your PC. The Odin that you’ve just downloaded is an essential tool & is must for installing Clockworkmod recovery on any Android device. We remind our users that this tool is an illegal way & is not officially released by Samsung. Even though it will not cause any damage to your device unless you follow the instructions properly.
Step 2: Switch off your Ace Plus completely and boot it in downloading mode.
Step 3: For Ace Plus, downloading mode can be entered by pressing & holding Home button + Volume Down key + Power button simultaneously until you see a warning message
Step 4: Press Volume Up key to continue. This will land you into downloading mode.
Samsung Galaxy Ace Plus Root & Clockworkmod recovery -Downloading-mode -warning
Step 5: Now you need to flash the Clockworkmod recovery on your device. Keeping your phone in download mode, connect it to PC via USB cable.
Step 6: Launch the Odin Multi Downloader3-v1.85 that you’ve downloaded earlier. You’ll see that an ‘Added’ message appears on the Odin window. Also the ID:COM section will turn yellow with a random COM PORT number below it. If it’s not showing, then check whether you have properly installed those device drivers on your PC or not (As mentioned in pre-requisites).
Galaxy-Ace-Plus-S7500-Clockworkmod-Odin-Added-msg-screenshot-1
Step 7: Tick the Auto Reboot and F.Reset Time option on the Odin. Do not tick or un-tick anything else.
Galaxy-Ace-Plus-S7500-Clockworkmod-Odin-Auto-reboot-screenshot-2
Step 8: On the Odin window, click on PDA tab and locate the ‘clockworkmod-5.0.2.8.tar.md5’ recovery file which you have downloaded before & select it.
Galaxy-Ace-Plus-S7500-Clockworkmod-Odin-PDA-tab-screenshot-3
Step 9: After completing everything as mentioned above, simply press the Start button located on the Odin window to execute the Clockworkmod flashing process. Your phone will automatically reboot itself while going through the process. It is recommended not to touch or remove the USB cable until the process completes.
Galaxy-Ace-Plus-S7500-Clockworkmod-Odin-Start-screenshot-4
Step 10: Wait until the Clockworkmod flashing process completes. It will hardly take 5 minutes to complete. As soon as it completes, you’ll see the ID:COM section on the Odin window is turned green with the message ‘Pass’ below it. Now you can safely remove the USB cable.
Note: Unfortunately due to some reason phone if the process fails or if Odin gets stuck or in case your device gets boot loops, then don’t panic. Just close the Odin window, remove and re-insert the battery from your device. Again go into downloading mode and repeat the whole procedure as given above.
Step 11: As all the flashing processes are completed now, let’s see whether the Clockworkmod recovery is properly installed or not. For that, firstly switch off your Galaxy Ace Plus.
Step 12: Now boot into recovery mode. For Ace Plus, recovery mode can be entered by pressing & holding Volume Up key + Volume Down key + Home button (Middle button) + Power button simultaneously until you land into recovery mode. You’ll notice that Clockworkmod Custom recovery is properly installed on your device.
That’s it! You’ve successfully installed Clockworkmod Custom recovery on your Samsung Galaxy Ace Plus GT-S7500. Now you can install Custom ROMs, take nandroid backup, wipe data/cache and much more.

Procedure to Root Samsung Galaxy Ace Plus S7500:

Method 1:
Step 1: Now its time to root your Galaxy Ace Plus. So firstly switch off your device completely.
Step 2: You need to enter into Clockworkmod recovery mode now. Recovery mode can be entered by  pressing & holding Volume Up key + Volume Down key + Home button (Middle button) + Power button simultaneously until the recovery mode appears.
Step 3: As soon as the Recovery Mode appears press Menu Button to grey out the screen. Keep your device in Recovery Mode as we will require it for rooting.
Step 4: On PC, download and extract the Rooting Package in a specific folder from the link given above. After extracting you’ll find ‘runme.bat’ file in extracted folder.
Galaxy-Ace-Plus-S7500-Root-Package-files-screenshot-5
Step 5: Keeping the phone in recovery mode connect it to PC using the USB cable.
Step 6: Run the runme.bat file to begin the rooting process. This will take a minute to complete.
Step 7: As soon as the process completes, restart your Ace Plus. This will root your device.
Note: If this method doesn’t work for you then try Method 2 given below.
Method 2:
Step 1: Download this SuperSU-ROOT-S7500 package file on your PC.
Step 2: Connect your Galaxy Ace Plus to PC, enable USB debugging mode and transfer that downloaded rooting package on your device external SD card.
Step 3: You need to enter into Clockworkmod recovery mode now. So switch off your mobile first. Then press and hold Volume Up key + Volume Down key + Home button (Middle button) + Power button simultaneously to enter into recovery mode.
Step 4: Navigate to the ‘install zip from SD card‘ option present on the recovery itself and select it. On the next screen, select ‘choose from SD card‘ option. This will show all the data present on your SD card.
Step 5: Now navigate to the SuperSU-ROOT-S7500 rooting package which you’ve just downloaded and select it. On the next screen select Yes option to initiate the rooting process.
Step 6: As soon as the process gets over, restart your Ace Plus by selecting ‘reboot system now’ option.
Your Galaxy Ace Plus S7500 has been rooted now. You can verify the same by going to your Apps list & check whether an app named Superuser is installed on your device or not. This Superuser app helps to supervise each application which requires a root access.
For installing Android 2.3.6 Gingerbread DDMF2 official firmware on your Ace Plus you may refer our article:
  1. Update Galaxy Ace Plus S7500 to Android 2.3.6 Gingerbread DDMF2 firmware.
Success
Good Job! You have successfully rooted & installed Clockworkmod (CWM) Custom Recovery on Samsung Galaxy Ace Plus GT-S7500.

Root Your Samsung Galaxy Ace 2 GT-I8160 [GB and JB]


FOR GINGERBREAD
What's you need:

  • Samsung Galaxy Ace 2 GT-I8160 with Gingerbread
  • Custom Kernel with CWM or TWRP such as EX Kernel.
  • SuperSU Flashable Zip Download HERE.
  • A Sharp Eyes.
  • Smart Brain.
Steps:
  • First, Put the SuperSU Flashable Zip to your SD Card.
  • Boot into Recovery Mode (Volume Up + Home + Power)
  • Flash the SuperSU Flashable Zip from recovery.
  • Wait
  • Choose "Reboot System Now"
  • Tadaa, now you have a rooted phone.
FOR JELLY BEAN
What's you need:

  • Samsung Galaxy Ace 2 GT-I8160 with Jelly Bean
  • Custom Kernel with CWM or TWRP such as D- Kernel. (Optional)
  • Stock Kernel. But you need CWM 6 by Shaaan. Download HERE.
  • SuperSU Flashable Zip Download HERE.
  • A Sharp Eyes.
  • Smart Brain.
Steps (Jelly Bean with Custom Kernel):
  • First, Put the SuperSU Flashable Zip to your SD Card.
  • Boot into Recovery Mode (Volume Up + Home + Power)
  • Flash the SuperSU Flashable Zip from recovery.
  • Wait
  • Choose "Reboot System Now"
  • Tadaa, now you have a rooted phone.
Steps (Jelly Bean with Stock Kernel):
  • First, Put the SuperSU Flashable Zip to your SD Card.
  • Boot into Recovery Mode (Volume Up + Home + Power)
  • Flash the CWM from stock recovery.
  • Flash the SuperSU Flashable Zip from CWM recovery.
  • Wait.
  • Choose "Reboot System Now"
  • Tadaa, now you have a rooted phone.