Download Files:
Rooting Package for Samsung Galaxy Core 2 SM-G355H.CWM Recovery for Samsung Galaxy Core 2 SM-G355H.
Odin3-v1.85 Multi Downloader.
Procedure to Root Samsung Galaxy Core 2 SM-G355H:
Step 1: Download the Rooting package from the above link and without extracting transfer it on your phones SD card using USB cable. Remember not to place it in deep directories.Step 2: Now you need to boot your Galaxy Core 2 into stock recovery mode. For that firstly power off your phone completely til it vibrates.
Step 3: For Galaxy Core 2, recovery mode can be entered by pressing and holding Volume up + Home button (Middle button) + Power button simultaneously until the recovery mode appears.

Note: As you enter the recovery mode you’ll notice that touch won’t wok here. So for navigating you need to use Volume Up and Volume Down keys and Home button (Middle button) for selection.
Step 4: Now navigate to the ‘Update from SD card’ option using Volume keys and select it using the Home button (Middle button).
Step 5: As you click on it, you’ll see all the files and folders located on your external SD card including the Rooting Package file which you have copied earlier.
Step 6: Now again using the volume keys, navigate to the Rooting Package (Update.zip) file and select it using Home button. On the next screen select Yes option to start the Rooting process. Be patient until it completes successfully.
Step 7: After successful rooting, you’ll again return to the main menu of Recovery mode. Just restart your Galaxy Core 2 by selecting ‘Reboot system now’ option.
That’s all! You’ve successfully rooted your Samsung Galaxy Core 2 SM-G355H smartphone. An app named Superuser installed on your phone will confirm that your device is properly rooted. This Superuser app supervises each and every app that requires a root access.
You can use this Root Checker app to confirm the same.
 Lets flash the CWM recovery now.
Procedure to Install CWM recovery on Galaxy Core 2:
Step 1: Download the CWM recovery package file on a specific folder on your computer. Extract it and you’ll see a recovery.tar.md5 file.Step 2: Also download and extract the Odin3-v1.85 on your computer.
Step 3: You need to boot your Galaxy Core 2 into downloading mode. For that firstly switch off your phone completely till it vibrates. Then press and hold Volume down key + Home button (middle button) + Power button simultaneously till you see a warning message. You may leave all the three keys now. Just press Volume up button to enter downloading mode.

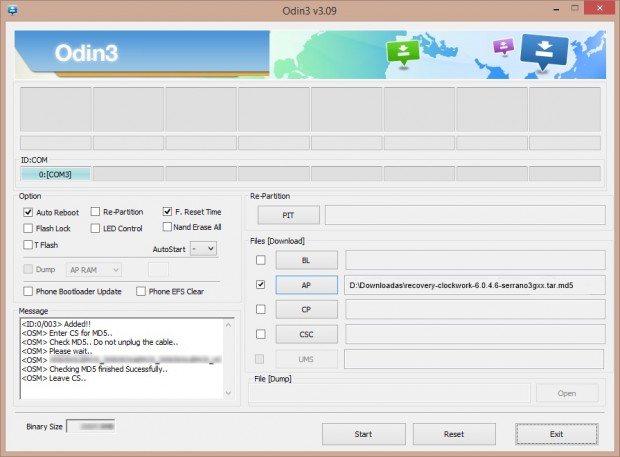
Step 4: Using USB cable connect your phone to PC. Now launch Odin3-v1.85 software on your PC. As you open it, the ID:COM section in it will turn yellow. Also an ‘Added‘ message will appear in the message box window. This will confirm that your Galaxy Core 2 has been successfully connected to your PC. If such thing doesn’t happen then try using different USB ports or different USB cable or just re-install the device specific drivers from the links given in Prerequisite section.

Step 5: Now tick the Auto-Reboot and F.Resest Time options present on the Odin window. Do not tick or un-tick anything else.

Step 6: On the Odin window, to the right hand side you’ll see a tab named PDA tab. Select that and locate the ‘recovery.tar.md5‘ file which you have downloaded before & select it.

Step 7: After completing everything as mentioned above, simply press the Start button located on the Odin window to initiate the CWM recovery flashing process. Your phone will automatically reboot itself while going through the process. It is recommended not to touch or remove the USB cable until the process completes.

Step 8: Be patient until the installation of CWM recovery completes. It will hardly take a minute. As soon as it completes, you’ll see the Pass message on the Odin window. You can safely remove the phone from PC now.
Note: If due to any reason the process fails or if Odin gets stuck or in case your device gets boot loops, then don’t panic. Just close the Odin window, remove and re-insert the battery from your device. Again go into downloading mode and repeat the whole procedure as given above.
Step 9: For confirming that CWM recovery has successfully installed or not, boot your Galaxy Core 2 into recovery mode. For that, firstly switch off your phone completely.
Step 10: Now press and hold Volume up + Home button + Power button simultaneously til the recovery mode appears. You’ll notice that Clockworkmod recovery is properly installed on your Galaxy Core 2.
Step 11: You can restart your phone by selecting the ‘reboot system now’ option present on the recovery mode itself.


